Nowadays, everything you plug into the wall wants to connect to the Internet. We are living in the era of the Internet of Things, but what are these “things” communicating, and with whom? Is privacy dead? Recently, I noticed my Wi-Fi-enabled outlet had a high volume of traffic (over 3 GB!), and I really want to understand why.
In this post, we will set up a Raspberry Pi with a USB Ethernet port so that we can connect devices and monitor the data being transmitted. The external Ethernet and internal Wi-Fi will be used to connect devices and capture all the traffic using tcpdump. Our Raspberry Pi will act as a “man-in-the-middle”—no more secrets.
The Hardware List
USB Ethernet ~ $10
Raspberry Pi 3B ~$50
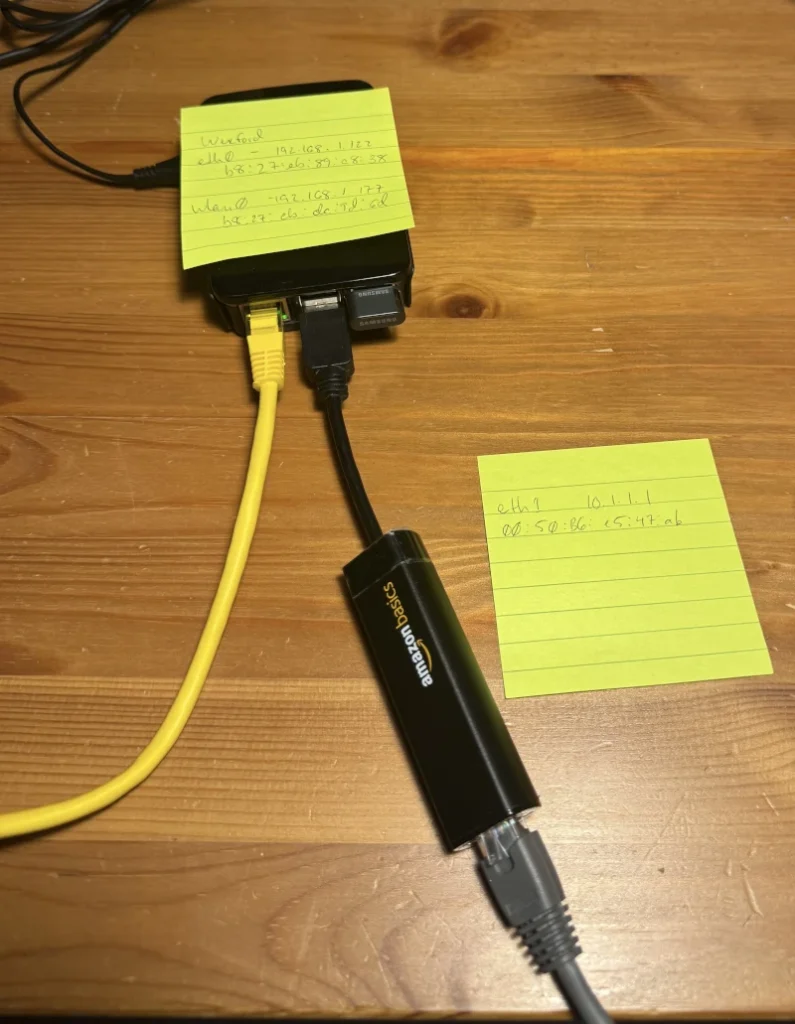
Connections
The onboard Ethernet is plugged into my home network and the internal Wi-Fi will be set up as a Wi-Fi access point for the isolated network. An USB Ethernet adapter will also be set up to access the isolated network.
Taking a step back I realized that I had the hardware and some of the knowledge to build a device that I could use to spot anomalies like data exfiltration without having to buy expensive monitoring hardware or buy expensive third-party software. With the rise of IoT botnets and large companies collecting personal data at any cost, I wanted a way for me and others to have some defenses. This project is strictly for personal use and should never be used to break any laws or violate another person’s privacy.
The Pi has Debian running on it from a previous project so I just updated the packages. I installed or updated the following packages that we are going to be using:
- hostapd – for running the access point
- dnsmasq – to run the DHCP server
- netfilter-persistant, iptables-persistant – firewall for NAT’ing.
- tcpdump – for traffic monitoring
- iw, wireless-tools – for the wifi interface
For the networking, I set up two subnets 10.1.1.1/24 for wired and 10.1.2.1/24 for wireless. In the future I plan on only using one subnet but for now this was the quickest and easiest way to just get it working. This follows the principle of first make it exist and then make it good.
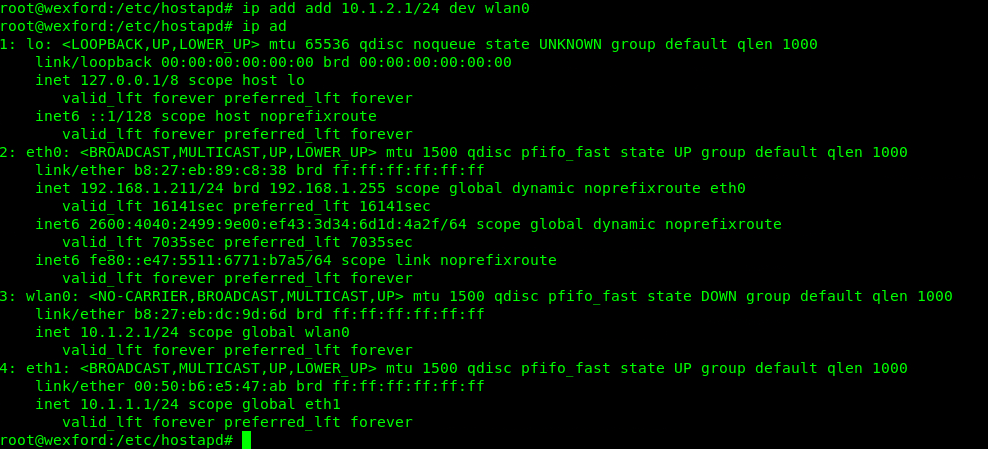
Set the IP addresses
# ip addr add 10.1.1.1/24 dev eth1
# ip addr add 10.1.2.1/42 dev wlan0

Verify
# ip add

Turn on Port Forwarding
/etc/sysctl.conf - net.ipv4.ip_forward=1

Load changes
# sysctl -p
Now that we have the IP addresses set, let’s set up the wired connection. If we were to plug in a device right now nothing would happen because the two devices aren’t on the same subnet. We will fix this by using Dynamic Host Configuration Protocol (DHCP) to give the new device an IP on the same subnet and to set the subnet mask, router, and DNS.
We are going to be using a service called dnsmasq to implement DHCP. I updated the config file to listen on our USB interface (eth1) and to assign IPs from 10.1.1.10 through 10.1.1.250 with the 255.255.255.0 subnet mask (which is the same as /24). 12h here is to specify a 12 hour DHCP lease.
Normally dnsmasq logs to syslog but I wanted to create its own log file just to make it easier to tail. I also added the option to log a lot of extra stuff for DHCP because this is all about visibility.

I pulled an old MacBook 2015 out of the closet for testing. If we plug it in right now, it will get a 10.1.1.x address and we can ping the pi from the MacBook and we can ping the MacBook from the pi. Good progress but not useful yet. The next step is to have the pi route any traffic that is internet bound out to my home network and from there to the Internet. This process is called Network Address Translation (NAT) with Masquerading and we are going to be using routing/firewire service NetFilter (NFT) to implement it.
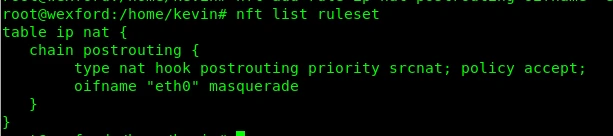
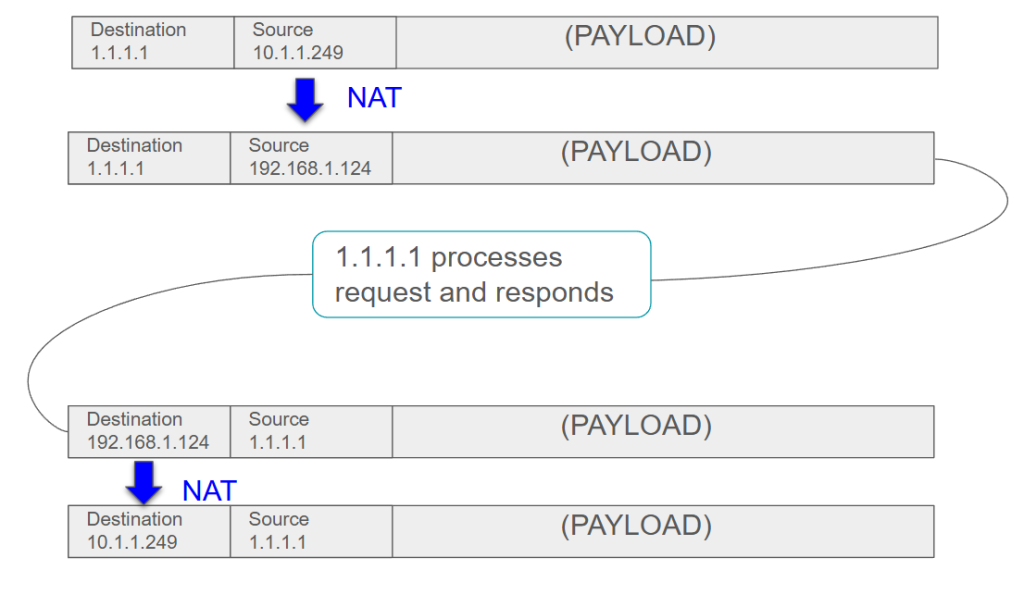
Network packets contain a source and destination address. The post-routing chain in the NAT table tells NFT to rewrite (or masquerade) the source address to whatever IP address of eth0 is. When we receive a reply, NAT knows to forward that packet to the ten-dot address that sent it. The server out on the internet doesn’t know the real address of the client and doesn’t need to know it to respond. The NFT router acts as the go-between.
NAT in Action
Our sheltered device now has its own subnet and access to the Internet. Now comes the payoff, since all of the traffic is going through the network device eth1 on the Pi router we can listen in on that device to eavesdrop. For this we use a program called tcpdump which listens to a network device and dumps the packets into a pcap file. For this post I have also tee’d the packets to standard out (stdout).
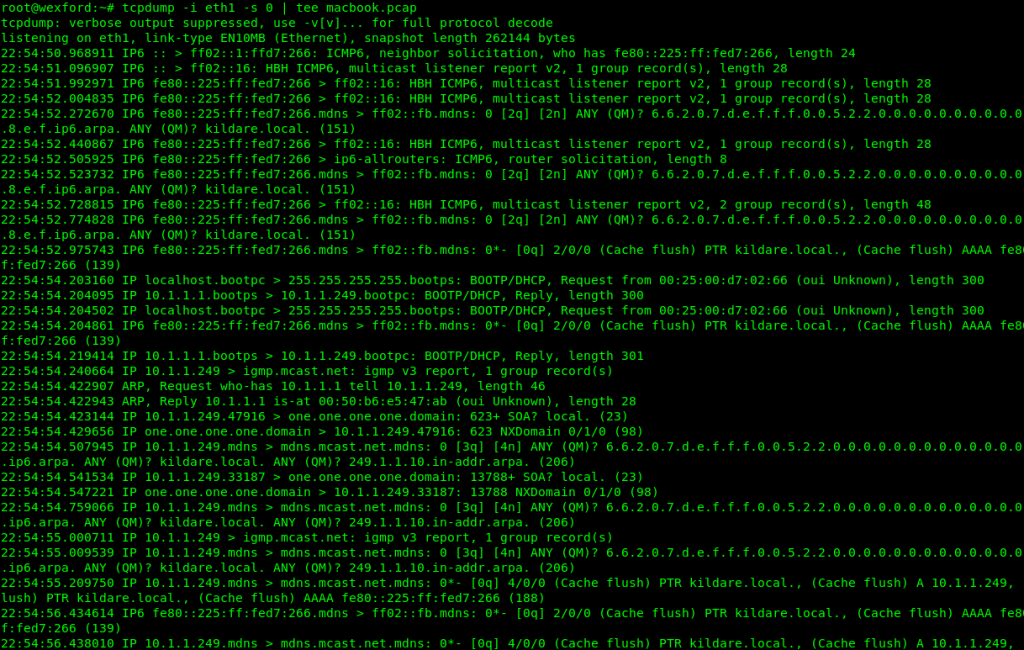
We can use tcpdump to view the file but Wireshark is much more user friendly. Below is a screenshot of Wireshark showing the capture of the MacBook (named Kildaire) visiting the wonderful website, www.tachyon.dev. Step one is Address Resolution Protocol (ARP) where the network hardware determines the IP address associated with the hardware address by asking. Apple_d7:02:66 is the address of the MacBook and GoodWayI_e5:47:ab is the address of our USB Ethernet port. Next we reach out to the DNS server at 1.1.1.1 to get the IP address of the webserver. Here we get the IPv4 (A) and the IPv6 (AAAA) address. Below the second DNS request we see the TCP connection and the Transport Layer Security (TLS) handshaking indicating the website is hosted using Secure HTTP (https).

Wireless
The Raspberry Pi 3B has a built in wireless adapter. We are going to see if it is capable to be a WiFi Access Point (AP) and if so, we are going set it up as one. Any device that connects to this AP will get an IP address from our DHCP server and get to the Internet through our router that we set up previously.
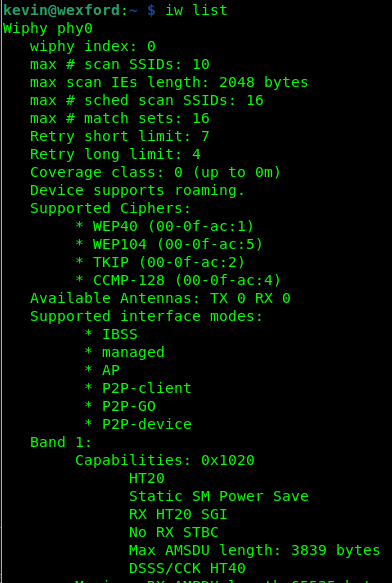
First we run the “iw list” command to see all of our Wi-Fi devices and their capabilities. In this case we just have the one device which is labeled “phy0”. Under “Supported interface modes” we see “AP” listed, that means we are good to go. We should also note the capabilities under Band 1. We will be using this info next when we create the HostAPd config. If you do not see a capabilities section then your Wi-Fi adapter probably doesn’t support 802.11n
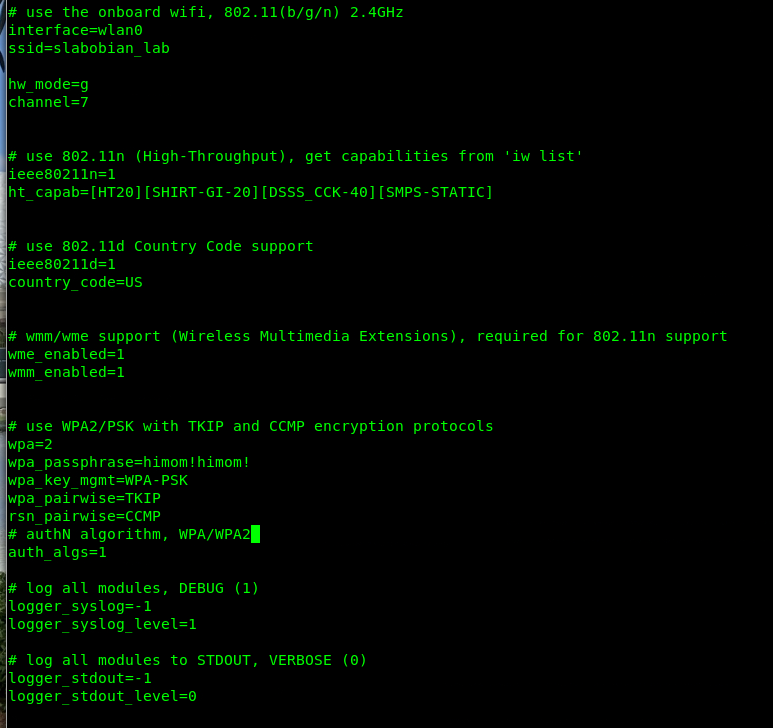
We are going to set up the wireless network “slabobian_lab” with the password, “himom!himom!” on the wlan0 interface.
The output from iw shows we have HT capabilities so we are going to set up the AP in 802.11 (b/g/n) mode which basically listens on a 2.4GHz channel for 802.11b, 802.11g, and 802.11n clients. We picked channel 7 for no particular reason but we can go back and change this if the channel is too crowded or noisy.
For security we chose WPA2 with a Pre-Shared Key (PSK) which is pretty standard for home / small business wifi. There is WPA2 Enterprise which would require us to set up a RADIUS service and is not worth the trouble for us.
Save the file to /etc/hostapd/hostapd.conf and run the service using:
# hostapd -dd /etc/hostapd/hostapd.conf
If it doesn’t exit out then it should be running okay.
To check, in another terminal we can use the command:
# iw dev wlan0 info
Type should be AP and SSID should be “slabobian_lab”
With HostAPd and dnsmasq running on wlan0 and tcpdump listening on eth0, let’s try connected to the AP with our phone.
I captured the traffic and filtered on DNS; lets take a look at the requests being made:
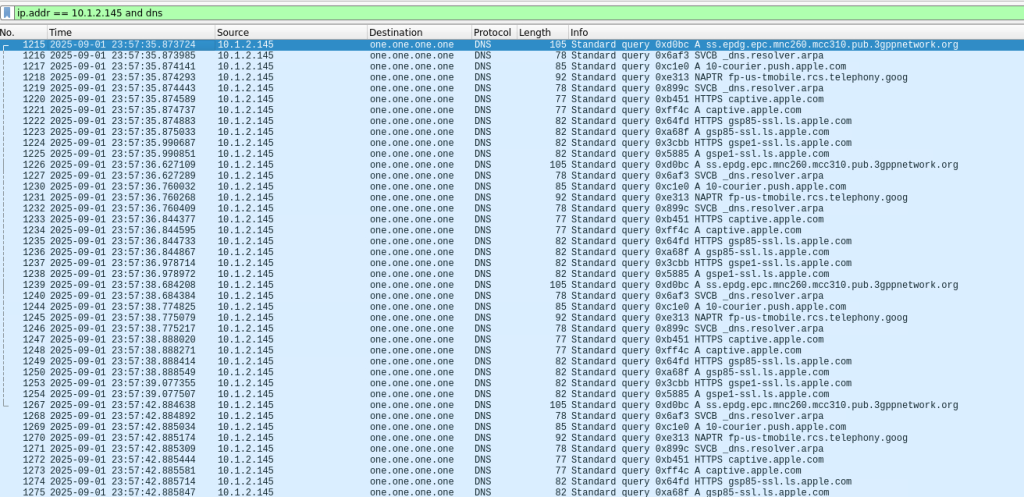
That’s a lot of requests! You can see the phone reaching out to Apple and T-Mobile so you can probably guess what kind of phone I have and which carrier I use. While the phone was connected I also browsed over to Slashdot.org. Here you can see I was browsing using https. I expanded the TLS handshake so you can see the cipher suite used:

Conclusion
Now that we have this setup, we can start doing some research. We can connect any device we want regardless whether it is wired and wireless and see what it is doing on the Internet. Of course, this doesn’t cover phones using cell networks or devices that sneak out on the Internet using open Wi-FI networks but it covers a lot.
Leave a Reply